Enabling security for ActiveMQ JMX access

Overview:

Apache ActiveMQ is the most popular and powerful open source messaging and Integration Patterns server. It is fast, supports many Cross Language Clients. Using this we can enable to message throttling, redelivery, delay of messages.

In the presentation will see how to enable the security for ActiveMQ JMX access to monitor and control ActiveMQ behavior

Accessing ActiveMQ through JMX in unsecured way:

First I will run the ActiveMQ instance with default configuration to show how we can access ActiveMQ JMX without entering any credentials (kind of unsecured access).

Note: Add useJmx=”true” attribute in the broker tag for a file “activemq.xml” available under ActiveMQ root folder/conf (as highlighted below). Otherwise you can’t access the ActiveMQ JMX.

Picture1

1)  First, run the activemq.bat available under ActiveMQ root folder/bin

Picture2

2) Now, open the jconsole using command prompt

Picture3

Picture4

.

3) Select the option “Remote Process” and enter “localhost:1099” and click on connect.

Picture5

4) It will take you to the JMX console to monitor and control activemq.

Picture6

Here we can observe that, we are able to access ActiveMQ through JMX without entering any security credentials.

This will be a one of security problem and we can see now how to solve by enabling the security for ActiveMQ JMX issue.

Accessing ActiveMQ through JMX in secured way:

To enable security, below are the lists of files needs changes

  1.  access & jmx.password available under ActiveMQ root folder/conf.
  2.  activemq.xml available under ActiveMQ root folder/conf.
  3.  activemq.bat available ActiveMQ root folder/bin.

The procedure follows

1)  The jmx.access & jmx.password files contain access privileges and credentials respectively. Update these files to add the new user or to update the existing user credentials accordingly.

2)  Now, it’s time to protect the jmx.password file. Make sure that file jmx.password has got only read permission to the user who’s going to run activemq.

Right click on jmx.password file –> properties –>  Security –> Advanced –> Change permissions –> Edit –> update permissions accordingly –> OK

Picture7

Note: The above step required when the file got access (read/write) to other users on system apart from user who’s going to run activemq. Otherwise you can skip this step.

In case if you forget to change file permissions and tried to start activmq, you will get the below error.

Picture8

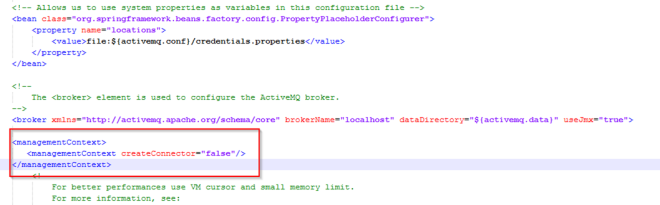
3)   Add managementContext configuration under broker tag in activemq.xml file to disable the ActiveMQ own connector creation so that it will use the default JVM JMX connector.

Picture9

4)  Finally modify the activemq.bat to add extra parameters to specify the location of JMX files and other configuration.(as highlighted).

Picture10

We are done with the required changes and now time to start activemq and open jconsole again.

If you try to login now without entering credentials, activemq won’t allow to login. Enter valid credentials that we specified in a file “jmx.password” to login.


Enabling security for ActiveMQ JMX access

Mule ESB Integration with Dropbox

Overview:

MuleSoft is a popular ESB technology to integrate various on-premise and cloud applications for data exchange. Dropbox is a cloud storage for personal and business people. Provides client software for many operating systems to sync with Dropbox account data. The Mule Dropbox connector allows applications to interact with Dropbox API to perform various actions.

In this blog will going to see how to Integrate Mule ESB with Dropbox account to perform Authorization and create folder actions using Mule ESB Anypoint Dropbox connector.

Prerequisites:

  • Dropbox Developer account.
  • Dropbox app key and app secret values
  • Mule studio with runtime version 3.4+
  • Mule Dropbox connector.

Dropbox Developer Account Setup:

Dropbox_Overview

  • Once account creation done, open the link and click on Create app button https://www.dropbox.com/developers/apps
  • Provide the appropriate values like below and click on Create app button available at bottom.

Dropbox_App

  • Finally note down the APP key and APP secret values and add the Oauth2 call back URL.

Dropbox_AppValues

MULE ESB Flows for Dropbox Integration

The below Mule application is used to create folder under Dropbox  account after performing authorization action using Mule Anypoint Dropbox connector.

Dropbox_MuleFlow

Steps to be followed for integrating ‘Dropbox’ with MuleSoft Applications:

Dropbox_Download

  • Create a new Anypoint Studio Project and Flow to create new folder.
  • Configure the Dropbox global element in global elements section by providing the App key and App secret values and setup the oauth callback for authorization.

Dropbox_Global

Dropbox_Oauth

  • In the flow first add HTTP inbound endpoint to trigger the service.
  • Add Dropbox endpoints in the flow for authorization and folder creation referring to Dropbox global connector.
  • In the Second Dropbox endpoint for folder creation enter MEL expression #[message.inboundProperties.’http.query.params‘.foldername] in path variable to create folder in the Dropbox account rootpath.
  • Now at this position we are integrated with Dropbox to perform actions.

Running and Testing the Application:

  • Right-click on the application –> Run –> Mule Application.
  • Open the browser and hit the url http://localhost:8082?foldername=Mule_POC_Folder
  • Service will take the control to Dropbox for authorization and grant the permission (This below screen will appear if you already logged in otherwise it will ask you to login first then below screen will appear).

Dropbox_Authorization

  • On the successful authorization, folder will be created under Dropbox account and response will be returned to browser like below screen in case of no errors

Dropbox_Response

Folder creation Under Dropbox

Open the Dropbox account, now you’re able to see new folder “Mule_POC_Folder”

Dropbox_FolderCreation

Mule ESB Integration with Dropbox

Mule ESB Integration with Stripe

Overview:

MuleSoft is a popular ESB technology to integrate various on-premise and cloud applications for data exchange. Stripe is an American company that allows both private individuals and businesses to accept payments over the Internet. Stripe specifically focuses on providing the technical, fraud prevention, and banking infrastructure required to operate online payment systems.  The Mule Stripe Connector enables developers to interact with Stripe API to accept payments, create invoices, coupons, cards and other various actions.

Prerequisites:

  • Stripe developer account.
  • Stripe API key.
  • Mule Anypoint Studio with Run time version 3.6+.
  • Mule Anypoint Stripe connector.

Stripe Developer Account Setup:

For this sample purpose, we need developer Stripe account. We can sign up for free at https://dashboard.stripe.com/login

Stripe_Developer_Account

Stripe API key Value:

Stripe developer account provides various options to control the communication between Stripe API to other applications. To access the full features of Stripe and connect with it, we need Stripe API key (For Test environment use Test Secret key). These values available under Stripe Your Account –> Account Settings

Stripe_API_Key

Mule Anypoint Stripe Connector:

Stripe is a online payment provider. Mule Stripe connector gives the options to integrate Stripe to perform the below options

  • CRUD for Customers
  • Accepts Payments
  • CRUD for Coupons
  • Create Invoices , plans , subscriptions etc.

MULE ESB Flows for Stripe Integration

The below Mule application is used to create Customer and Coupon under Stripe using Mule Anypoint Stripe connector.

Stripe_Mule_Flow

Steps to be followed for integrating ‘Stripe’ with MuleSoft Applications:

Stripe_Download

  • Create a new Anypoint Studio Project and Flow to create customer and coupon
  • Configure the Stripe global element in global elements section by providing the Stripe API key

Stripe_Global_Element

  • In the flow first add HTTP inbound endpoint to trigger the service.
  • Add choice router to route the control to create customer or create coupon based on request action query parameter.
  • Now at this position we are integrated with Stripe to perform actions.

Running and Testing the Application:

Customer Creation under Stripe:

Stripe_Customer_Creation

Coupon Creation under Stripe:

Stripe_Coupon_Creation

Mule ESB Integration with Stripe

ActiveMQ Master Slave Setup using Shared broker Data

Overview:

Apache ActiveMQ  is the most popular and powerful open source messaging and Integration Patterns server.

Apache ActiveMQ is fast, supports many Cross Language Clients. Using this we can enable to message throttling, redelivery, delay of messages.

In this blog will going to see, how to setup ActiveMQ as Master Slave topology using Shared broker Data.

Steps for ActiveMQ master slave setup:

  • Download the ActiveMQ installer from here http://activemq.apache.org/activemq-5100-release.html
  • Extract the downloaded installer (apache-activemq-5.10.0.zip) to C:\apache-activemq-5.10.0_Master.
  • Extract the downloaded installer (apache-activemq-5.10.0.zip) to C:\apache-activemq-5.10.0_Slave.
  • Open the activemq.xml available under slave broker (C:\apache-activemq-5.10.0_Slave\conf). Change the port numbers for “openwire” and “amqp” and remove the other transport connectors as those are not required(This is to avoid conflict between master and slave brokers).

AQ_ConenctionPorts

  • Open the jetty.xml available under (C:\apache-activemq-5.10.0_Slave\conf) and change the web console port value to 8162 (As Master broker web console port will have default 8161).

AQ_WebPort

  • Now both activemq instances are ready to run independently. Its time to set up the master slave topology using shared broker data.
  • Create a new folder c:\apache_activemq_shared_broker.
  • Open the activemq.xml available under master broker (C:\apache_activemq-5.10.0_Master\conf) and do the below things
  1. Add the below highlighted tag “persistenceAdapter” and point to the above created folder (C:\apache_activemq_shared_broker).
  2.  Modify the tag “dataDirectory” available at root “broker” tag by pointing   to the shared broker directory c:\apache_activemq_shared_broker.
  3. Add the new element schedulerSupport=”true” in the root “broker” tag.
  • After all the above changes, activemq.xml file will look like below

AQ_ModifiedXML

  • Address the same above changes in Salve broker activemq.xml file available at (C:\apache-activemq-5.10.0_Slave\conf).

Testing the setup:

  • Now start the Master active broker by running the activemq.bat available at (C:\apache-activemq-5.10.0_Master\bin\Win64\). Here Win64 depends on windows version you’re using. If you’re using 32 bit run active.bat available under Win32 instead of Win64.

AQ_Master

  • Now start the Slave activemq broker by running the activemq.bat available at (C:\apache-activemq-5.10.0_Slave\bin\WIN64). You can observe that slave broker is waiting for the lock and it’s trying to check for every 10 seconds about lock availability.

AQ_SlaveBroker

  • Now if the master broker becomes unavailable, Slave broker will get the lock and becomes Master. Once unavailable broker has been started then it will join the topology and acts like slave broker.
ActiveMQ Master Slave Setup using Shared broker Data

Mule ESB Integration with ServiceNow

Overview:

MuleSoft is a popular ESB technology to integrate various on-premise and cloud applications for data exchange. ServiceNow is a platform-as-a-service (PaaS) provider of enterprise Service Management (SM) software. Provides wide variety of options to control all the support activities i.e. Incident, request, tracking, status, follow-ups and etc. The Mule ServiceNow connector enables developers to interact with ServiceNow API to create issues and incidents and fetch data from any where, any time and any amount volume.

Prerequisites:

  • ServiceNow developer account.
  • ServiceNow instance and access details.
  • Mule Anypoint ServiceNow connector.

ServiceNow Developer Account Setup:

For this sample purpose, we need developer ServiceNow account. We can sign up for free at https://developer.servicenow.com

SN_Overview

ServiceNow instance and access details:

  • Once the account has been setup, need to make request for instance using tabs MANAGE –> Instance –> Request for Instance
  • Instance will be created and gives the details (Instance URL, Instance login username and Instance login password)
  • Here Instance means, dedicated dashboard where you can control all your requests and incidents.
  • Login to the ServiceNow Instance with the provided details.

SN_Instance

Mule Anypoint ServiceNow Connector:

ServiceNow is a platform-as-a-service (PaaS) provider of enterprise Service Management. Mule ServiceNow connector provides more than 30 operations to interact with ServiceNow API to perform

  • Incidents management
  • Request management
  • User management.

MULE ESB Flows for ServiceNow Integration

The below Mule application is used to create request under ServiceNow using Mule Anypoint ServiceNow connector.

Mule_flow

Steps to be followed for integrating ‘ServiceNow’ with MuleSoft Applications:

Connector_download

  • Create a new Anypoint Studio Project and Flow to create request.
  • Configure the ServiceNow global element in global elements section by providing the instance URL, instance username and instance password.

Global_element

  • In the flow first add HTTP inbound endpoint to trigger the service.
  • Add Servicenow endpoint in the flow to create request by refering to Servicenow global connector.
  • Now at this position we are integrated with Servicenow to perform actions.

Running and Testing the Application:

  • Right-click on the application –> Run –> Mule Application.
  • Open the browser and hit the URL http://localhost:8081/createRequest
  • Service will create the request in ServiceNow instance and gets the created request id back in the response in case of no errors
  • Below screen shot shows response after successful creation of request and you can notice request number REQ0010012

SN_response

Request creation under ServiceNow instance:

SN_Request_creation

Mule ESB Integration with ServiceNow

Mule ESB Integration with Box

Overview:

MuleSoft is a popular ESB technology to integrate Different on-premise and cloud applications for data exchange. Box is an online file sharing and personal cloud content management service for businesses. It’s a cloud based service that helps people and organizations share and collaborate the documents with colleagues, partners, and customers. The Box Mule connector allows developers to interact with Box to fetch any amount of data, any file and from anywhere on the web. Using connectivity to the Box API, developers can perform the CRUD operations along with other Box operations.

Instant access to the Box API enables businesses to create seamless integration between Box and other applications such as EchoSign, Autodesk, Zoho, ThinkFree, Scribd, Picnik, Zazzle, Twitter and Myxer.

Prerequisites:

  1. Box Developer account.
  2. Box Developer account client ID and Client key.
  3. Mule AnyPoint Box connector.

Box Developer Account Setup:

For this sample purpose, we need developer Box account. We can sign up for free at https://developers.box.com/

Box_overview

Client ID and Client Secret Values

Box developer account provides various options to control the communication between Box api to other applications. To access the full features of Box and connect with it, we need client ID and client Secret values. These values available under box developer account.

ClientID_Values

Mule Anypoint Box Connector:

Box is a cloud file storage and collaboration application. Mule Box connector gives the options to integrate Box to perform he below options

  • User Management.
  • CRUD for Documents
  • Events

MULE ESB Flows for Box Integration

The below Mule application is used to create folder under Box using Mule Anypoint Box connector after performing authorization.

Mule_flow

Steps to be followed for integrating ‘Box’ with MuleSoft Applications:

Box_Connector_Downlaod

  • Create a new Anypoint Studio Project and Flow to create new folder.
  • Configure the Box global element in global elements section by providing the client Id and client secret values and setup the oauth callback for authorization.

BoX_Global_connector

Box_Oauth_callback

  • In the flow first add HTTP inbound endpoint to trigger the service.
  • Add Box endpoints in the flow for authorization and folder creation referring to Box global connector.

Now at this position we are integrated with Box to perform actions.

Running and Testing the Application:

  1. Right-click on the application –> Run –> Mule Application.
  2. Open the browser and hit the url http://localhost:8082/CreateFolder.
  3. Service will take the control to box for authorization and grant the permission. On the successful authorization, folder will be created under Box account.
  4. Open the Box, now you’re able to see new folder in case of no errors.

Folder creation Under Box

Box_folder_creation

Mule ESB Integration with Box

Mule ESB Integration with Atlassian JIRA

Overview:

MuleSoft is a popular ESB technology to integrate different on-premise and cloud applications for data exchange. Atlassian JIRA is a planning and an issue tracking product. It provides bug tracking, issue tracking, and project management functions. JIRA provides wide range of options to control all the activities to maintain project and allows other applications to connect remotely (Via JIRA SOAP API) to create projects, issues and to perform other activities. The JIRA Mule Connector allows developers to connect JIRA remotely to perform different actions as part of Mule process flows.

Instants access to the Atlassian JIRA API enables business to create seamless integration with Atlassian JIRA with production systems and it allows creation of different activities on the fly.

Prerequisites:

  1. Atlassian JIRA software installed on local server.
  2. Atlassian JIRA Account with user name and password.
  3. Mule AnyPoint JIRA Connector.

Atlassian JIRA Installation and Account Setup:

  • Atlassian JIRA provides the option to install the JIAR either on cloud based or in local server. To complete the sample demo, I will explain how to install on local server.
  • The Software can be downloaded from here. Once downloaded, run the installer and it will install the JIRA on your local machine.
  • Now, you’re able to see options on start windows. Just click on the “Start JIRA Service [8080]” to start JIRA.

Jira_Install

  • Open the URL http://localhost:8080 on your browser. Set up the account by creating user name and password.

JIRA_Overview_page

  • Now, we need to enable the option to allow remote calls via JIRA api as it’s by default disabled. For this Settings(Symbol) –> System –> Confirm Admin Access –> General Configuration –> Edit Settings –> Accept remote API calls   –> ON

Mule Anypoint JIRA Connector:

Current Mule JIRA connector enables integrating with JIRA and provides option to perform more than 40 activities.

MULE ESB Flows for JIRA Integration

Mule_flow

The above Mule application flow is used to create new project and creates a new issue in JIRA using Mule Anypoint JIRA connector.

Steps to be followed for integrating ‘Atlassian JIRA’ with MuleSoft Applications:

mule_download

  • Create a new Anypoint Studio Project and Flows to create new project and issue.
  • To use the JIRA endpoint in the flows, first we need to create JIRA global element to specify connection details.
  • Configure the JIRA global element in global elements section by providing the username, password and Connection Address. Here connection Address typically in the format ofhttp://<Host>:<Port>//rpc/soap/jirasoapservice-v2

mule_global_configuration

  • Use the HTTP Inbound endpoints to trigger the service and to create new project and issue in JIRA.
  • Finally create the JIRA global endpoint in both the flows by pointing to Global element and mention the required operation names and parameters.

Now at this position we are integrated with JIRA to perform Create Project and Create Issue (task)

Running and Testing the Application:

  1. Right-click on the application –> Run –> Mule Application.
  2. Open the browser and hit the URL http://localhost:8082/CreateProject.
  3. Open the JIRA, now you’re able to see new Project in case of no errors.
  4. To create new issue (Type “Bug”), we need add issue types to newly created project as default it will not contain all the issue types. To do that, Setting (Symbol) –> Projects –> Select Project –>Issue Types Scheme –>  Actions –> Edit Issue Types –> Add all –> Save
  5. Now, open the browser and hit the URL http://localhost:8083/CreateIssue.
  6. It will create new issue under newly created project in case of no errors.

Project and Issue creation Under JIRA

JIRA_Issue_page

Mule ESB Integration with Atlassian JIRA